How to Finish a Basement

Do you have an unfinished basement just crying out to become useful, clean, and attractive additional living space? If you know how to finish a basement, you can add some of the most inexpensive additional space possible.
Now, you might be thinking, “How can my dark, dirty, smelly basement ever become pleasant living space?” Let me assure you. There are ways to conquer all basement shortcomings, even the dreaded basement smell. So let’s tackle that problem first.
Step One – Stop Water and Control Moisture
When you mention moisture in basements, most folks will automatically think of water seeping through the walls and covering the floor. There are several things you can do to stop moisture from entering your basement. But moisture in basements comes from two sources, water that enters the basement through walls and floors AND water that comes in through the air.
I’m talking about humidity that can become condensation on walls, pipes, and floors. Condensation is real water and is actually the primary cause of that musty basement smell we all hate. Knowing how to finish a basement starts with knowing how to eliminate moisture of both types. Controlling humidity in basements is critical.
Step Two – Add Daylight
This step may or may not be possible for your particular basement. But if there is any way you can add a window or glass door to the basement, you’ll be glad you went to the effort to make it happen. Getting natural light into a basement and giving the new room a view to the outside will make the new room feel like any other room in your house and not feel like a typical basement room.

If your house is on a sloping site, you probably have an opportunity to add a window. If it slopes enough, you might be able to make it a true walk-out basement. It’s not as difficult to cut through a concrete block or even a poured concrete wall as you might think. They make great saws for that. This may be above the level of most handymen. So consider hiring a contractor for this portion of the work.
If you don’t have a slope to work with, windows can still be placed high in basement walls and a window well can be created on the exterior to bring the ground down around the window. Just be sure to provide good drainage out of this well so you can avoid any flooding potential.
Step Three – Plan the Design
I never like to start a project without knowing what the final goal is. Without a plan you will just be winging it and wasting time and money along the way. In the first two steps, you took care of the potential problems and gave yourself more opportunities if you were able to introduce some natural daylight. But you have to figure out how to get the most out of the space you have.
Start by listing the functions of the new space and what size space you will need to accommodate it. Will there be a pool table? There are critical dimensions for pool cues that you must plan for. Will the room be a bedroom, an office, a family room, or a home theater? Will it be a home gym? Is there going to be a bathroom? All of these types of rooms have specific dimensions and requirements. List those out in a short “program.”
Next, measure out your available space and draw this up accurately, to scale. That will give you a good place to assemble the spaces you need and make sure they all fit. This step is a bit like working a puzzle. Your goal is to make the most efficient use of the space.
Of course, if you have windows in your basement, you’ll want the “living” spaces to be positioned to include them. Bathrooms, home theaters, home gyms, and closets can be place back in the darker areas of the basement.
Once you have drawn up an accurate plan with doors and fixtures located optimally, you will be able to make good estimates of materials needed, get solid bids from any contractors, and properly lay out the walls for construction.
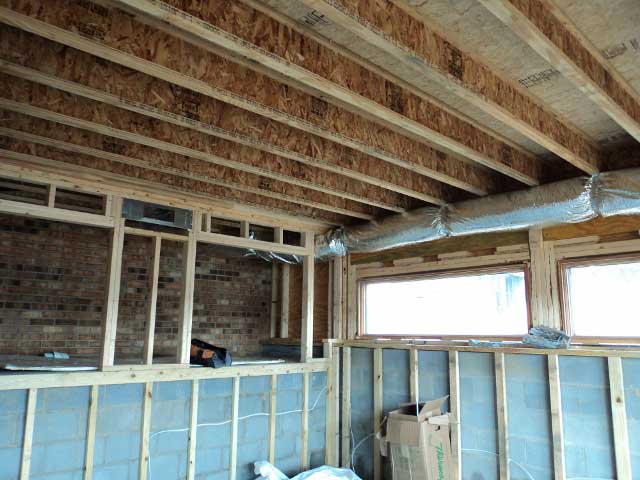
Step Four – Plan the Ceiling
Knowing how to finish a basement is more than just slapping drywall or ceiling tiles up and calling it finished. To get the best result, you need to plan the design of the ceiling. Take a look at your basement ceiling. Chances are you have ductwork and pipes running all over the place. When your house was built, the builder probably gave no thought to placing pipes and ducts in convenient places for an eventual finished basement.
Every mechanical item that extends down from the bottom of the floor joists is going to create a lump in your new ceiling. Some of this may be unavoidable. But it might be possible to move some ducts and pipes out of the way. Ideally, you would want to move them to the perimeter of the ceiling. It might mean some added work and expense, but if you can get these obstacles out of the way, you can keep the ceiling in the center of your new rooms as high as possible. Then you can create a soffit to box in the pipes and ducts at the edges of the room.
I like to go further and drop a soffit all around the room to match the ones that enclose ducts and pipes so that the room is symmetrical and the new ceiling becomes a tray ceiling. It will now be a feature instead of an eyesore. No one would even suspect that one portion of the tray shape actually hides ducts and pipes.
By the way, you basement ceiling does not need to be suspended acoustical tiles. Often people use these ceilings because they believe they need to maintain access everywhere for mechanical service. Actually, only a few spots will need access. You could install access panels at those locations in a nice drywall ceiling.
But access is really needed infrequently, unless it is access to an air damper, or something. My feeling is that drywall is “accessible.” You can cut it out and patch it back in fairly easily. You probably don’t really need an access panel for a situation that may occur every ten or fifteen years. And your ceiling will look better for it.
Step Five – Heating and Air Conditioning
When people ask me how to finish a basement the right way, I tell them to pay particular attention to getting the air quality right. You will want a properly designed heating and air conditioning system. Ideally, this system should be an extension of your existing system and not a separate one. This may seem counter-intuitive, but let me explain my reasoning.
Because basements are surrounded by earth, they tend to stay at fairly even temperatures year round. They stay cool in summer and they never get as cold as the outside air in winter. Because of this, basements are a great “heat sink” that can help stabilize the air temperature in the whole house if you mix the basement air with the air in the entire house. That will reduce your heating and cooling costs substantially.
You might be thinking, “Hey, Bill. That sounds great, but I don’t want my whole house to smell like a basement.” I hear you. That is why we worked to control moisture in Step One. If you control moisture, you control mustiness and mildew. And by stirring the air in the basement and mixing it throughout the house, you will have even better air quality in the basement and throughout the house.
Important – If a portion of your basement is going to remain unfinished. I recommend that you insulate that area and provide heat and air conditioning there, too. This will improve the air quality in the unfinished spaces while further improving the energy efficiency of the entire house.
Step Six – Plumbing
Yes, it is possible to add plumbing fixtures to an existing basement. The supply pipes carrying hot and cold water can come from above. But waste pipes have to go below the fixtures. Waste pipes for toilets have to go in the floor. Installing a new toilet will require some chopping into the concrete and laying pipes. Try to place the plumbing where it makes sense in terms of connecting to your existing piping. Chances are there is a main waste line dropping down from the first floor that connects with the sewer or septic system. The best place for a new bathroom or other plumbing is right next to it.
Step Seven – Insulate the Basement
This is a key. It adds greatly to the comfort of the new rooms. There are several ways to insulate your basement. You can use foam insulation, rigid insulation boards, or fiberglass batts. This insulation will serve two purposes.
First, it will keep heat from being transferred through the walls. Even though a good portion of the basement walls are below grade (underground), the ground is still cooler than the air in the basement. You need to stop that transfer of heat.
Secondly, properly placed insulation will eliminate condensation on basement walls. This is critical to controlling moisture and that musty basement smell in the new rooms and the entire house. Make sure there are no places where warm moist air can come in contact with cool basement walls or you walls will end up looking like the outside of a glass of iced tea in July. This condensation will grow mold.
Think about adding insulation in the ceiling of the basement, too. This should be sound insulation to help dampen walking sounds from above and, if you have a home theater in the basement, helping to keep those loud sounds from the movie you are watching from echoing throughout the house.
Step Eight – Build the Framing
After you have made decisions about the HVAC, plumbing, insulation, etc. and incorporated that information into the plans, it is time to start framing walls. This is where the progress shows the most. You should not need to use pressure treated wood if you already addressed the moisture and water considerations. Wood sitting on dry concrete will be fine and not rot. Often, I see people finish basements with thin furring strips on the concrete walls with a skinny panel of insulation between the furring strips.
In my opinion, that is not a good idea. There will not be enough insulation to properly insulate the basements. And the concrete walls are likely to not be straight. This means your new drywall over the furring strips will be just as wavy as the concrete wall it is attached to. It’s better to frame the perimeter walls with 2×4 studs. This will produce smooth walls, better insulation, and it will give you the right depth for electrical outlets in the wall cavity.
Don’t forget to add in solid blocking in locations where you will be hanging things on the wall, like towel bars, pictures, and the big screen TV. Solid wood blocking is cheap and easy to install at the framing stage. And you will have plenty of strength to hold up almost anything.
Step Nine – Install Electrical and Lighting
With the framing installed, you can go ahead in install the electrical wiring, junction boxes, and recessed light fixtures. You got a building permit for this project, didn’t you? If not, you just might have turned your “How to Finish a Basement” project into a “How to Burn Down Your House” project. Getting the proper inspections will make your house safer.
Often folks will avoid getting a permit for home improvements because they worry this will cause their property taxes to go up now that their house is more valuable. But they really should worry about keeping their homeowner’s insurance intact. If any of the unpermitted work causes damage to the house, e.g., fire or flood, then your insurance company is probably going to refuse to pay for the damages. Personally, I don’t think it is worth the risk. And Professionally, I say you should always get a permit for any work that requires a permit. Avoiding it is just plain stupid.
So please get the proper permits and have the work properly inspected. If you are hiring a contractor to do the work and he tells you he won’t get a permit, you should take that as a warning that he is probably not licensed. Get rid of him and find a licensed contractor.
Step Ten – Doors, Trim, Floor Finishes, and Painting
Now the rough work is done. Here’s where you install and finish the drywall, hang the doors, trim the doors and baseboards, paint the rooms, and install the floor finishes. Here’s where your new rooms start to show themselves. If you haven’t already selected these things, now is the time. There are many good floor finishes available for installation right on top of a concrete floor. Tile, engineered wood floors, and luxury vinyl tile are good choices.

Carpet is a good choice because it makes rooms feel warmer and comfortable, provided you solved the moisture issues. Often people think of carpet in basements as a mold and mildew problem waiting to happen. This is caused not by moisture coming in through the floor and walls, but rather by moisture that condenses on the cool surface of the concrete slab. By properly designing the HVAC system and using a good pad under the carpet, you will isolate the slab from any moist warm air and condensation won’t form. It works just like we discussed on the walls.
Follow these ten steps and you will know how to finish a basement. I hope your newly finished basement turns out great.
I hope this information is helpful to you. You might want to get yourself a copy of my best-seller, Designing Your Perfect House. It is chockfull of valuable tips and advice that will save you many times the cost of the book on your house building or remodeling project. You might also like The Well-Centered Home: Simple Steps to Increase Mindfulness, Self-Awareness, and Happiness Where You Live. It will show you how to make your home a happy place.